How-to
How to Generate Images in Claude
Claude does not render images on its own, but it can with an image generation connector. Set it up in a minute, then create and edit images from the chat.

Claude cannot paint a picture by itself. It is a language model: it can describe an image in detail, write the prompt for one, or draw diagrams as code, but it does not render photos or illustrations. Add an image generation connector and that changes. Claude gets tools that call image models, so you can ask for a product shot or a poster in the chat and get the file back in the same conversation. This guide shows the setup for Claude.ai, Claude Desktop and Claude Code, the prompt to try first, how to edit images and what each image costs.
Can Claude generate images on its own?
No. Anthropic's help center says Claude is not built to create images the way dedicated image tools are. It can make diagrams, charts and interactive visuals with HTML and SVG, and it can read images you upload. For photographs, illustrations, product renders or edits to a real photo, Claude needs a tool connected over the Model Context Protocol (MCP).
That is what Makemancer provides: a remote MCP server with image, video, voice and music tools. Claude decides when to call them, writes the model prompt from your request, quotes the cost and returns the result.
Step 1: Connect the image tools
Pick the app you use. Each takes about a minute and needs no API key.
Install the Claude plugin
One install adds the connector and every Makemancer skill, and keeps them updated. Works in Claude.ai, Claude Desktop and Cowork.
- 1
Add the Makemancer marketplace
In Claude, open Customize, then Plugins. Under Personal plugins choose +, then Add marketplace, and paste:
makemancer/makemancer-marketplace - 2
Add the plugin
Find Makemancer and choose Add. This adds the connector and every skill to your Claude account.
- 3
Connect and sign in
Open the plugin's Connectors tab, choose Connect and sign in with your Makemancer account.
Done. Start a new chat and try the prompt below.
Works on every Claude plan, Free included; on Team and Enterprise your admin may need to allow plugins. No Plugins tab? Add the connector and the skills by hand below. Official guide
Other ways to connect
No Plugins tab? Add the connector and skills by hand
- 1
Open connector settings
Open Claude's connector settings. The button opens the Add custom connector dialog. In Claude Desktop, go to Customize, then Connectors, then Add.
Open connector settings - 2
Paste the server URL
Name it Makemancer, paste this server URL and choose Continue.
https://makemancer.com/api/mcp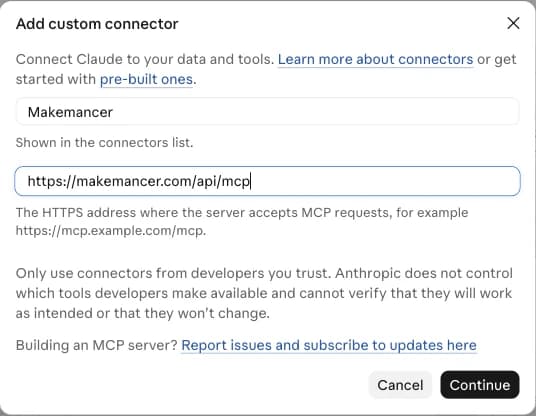
- 3
Connect and sign in
Choose Connect and sign in with your Makemancer account. In a chat, open the tools menu and check that Makemancer is switched on.
- 4
Add the skills
Download the skills ZIP, then in Claude open Customize, then Skills, choose +, then Upload a skill, and pick the ZIP. Your assistant then follows the same workflows as the plugin.
Download makemancer-skill.zip
Install the Claude Code plugin
The connector and every skill in one plugin. Works in the terminal, IDEs and the desktop Code tab.
- 1
Add the marketplace
Run this inside Claude Code:
/plugin marketplace add makemancer/makemancer-marketplace - 2
Install the plugin
Then install it:
/plugin install makemancer@makemancer-marketplace - 3
Sign in
Run /mcp, choose makemancer and sign in when the browser opens.
/mcp Done. Try the prompt below.
Works with any Claude Code login. Added the server by hand before? Remove it with claude mcp remove makemancer so it does not show twice. Official guide
Other ways to connect
Add the MCP server only
- 1
Add the server
No skills, just the tools. Run this in your terminal:
claude mcp add --transport http makemancer https://makemancer.com/api/mcp - 2
Sign in
Start Claude Code, run /mcp, choose makemancer and sign in.
The free Claude plan allows one custom connector, which is enough for this. ChatGPT and Codex users can follow the connection guide for their app.
Step 2: Ask for your first image
Start a new chat and describe the picture: the subject, the setting, the light and the format. Asking for the cost first is a good habit while you learn the prices.
Prompt to paste
Make a square photo of a speckled stoneware mug of coffee on linen, soft morning light. Tell me the cost first.Claude replies with the model it chose and the credits, runs the job once you agree, and shows the image in the chat. The file is saved to your library with a permanent link, so you can reuse it in later requests or download it. This is what a request like that returned with the default model:

Step 3: Edit and iterate
Most good images take two or three rounds. You can:
- Change one thing. "Make the mug terracotta and keep everything else." Claude sends your last image back to the model as the image to edit.
- Edit your own photo. In Claude Code, point to a file in your project and Claude uploads it. In Claude.ai, paste a link to the image.
- Use references. Add one or more images for style, a character or a layout, and say what each one is for.
- Change the size. Ask for a 9:16 story, a 16:9 banner or a higher resolution such as 2K.
Which image model to use
Claude uses Nano Banana 2 unless you name another model. These are the ones worth knowing:
| Model | Best for | Credits |
|---|---|---|
| Nano Banana 2image/nano-banana-2 | Everyday default: photos, edits and mixed references. | 121K · image |
| GPT Image 2image/gpt-image-2 | Posters and designs with legible text. | 471K · image |
| Seedream 5 Proimage/seedream-5-pro | Product and marketing shots at 1K or 2K. | 182K · image |
| FLUX 2 Proimage/flux-2-pro | Clean professional results with no settings to tune. | 71K · image |
| FLUX Kontext Maximage/flux-kontext-max | Precise edits to an existing image, including signs and labels. | 16per image |
| Recraft V3image/recraft-v3 | Flat illustration and design styles. | 8per image |
To compare models, ask Claude to run the same prompt on two of them. Each run is charged separately. For a poster with a headline, GPT Image 2 kept the lettering clean and legible:
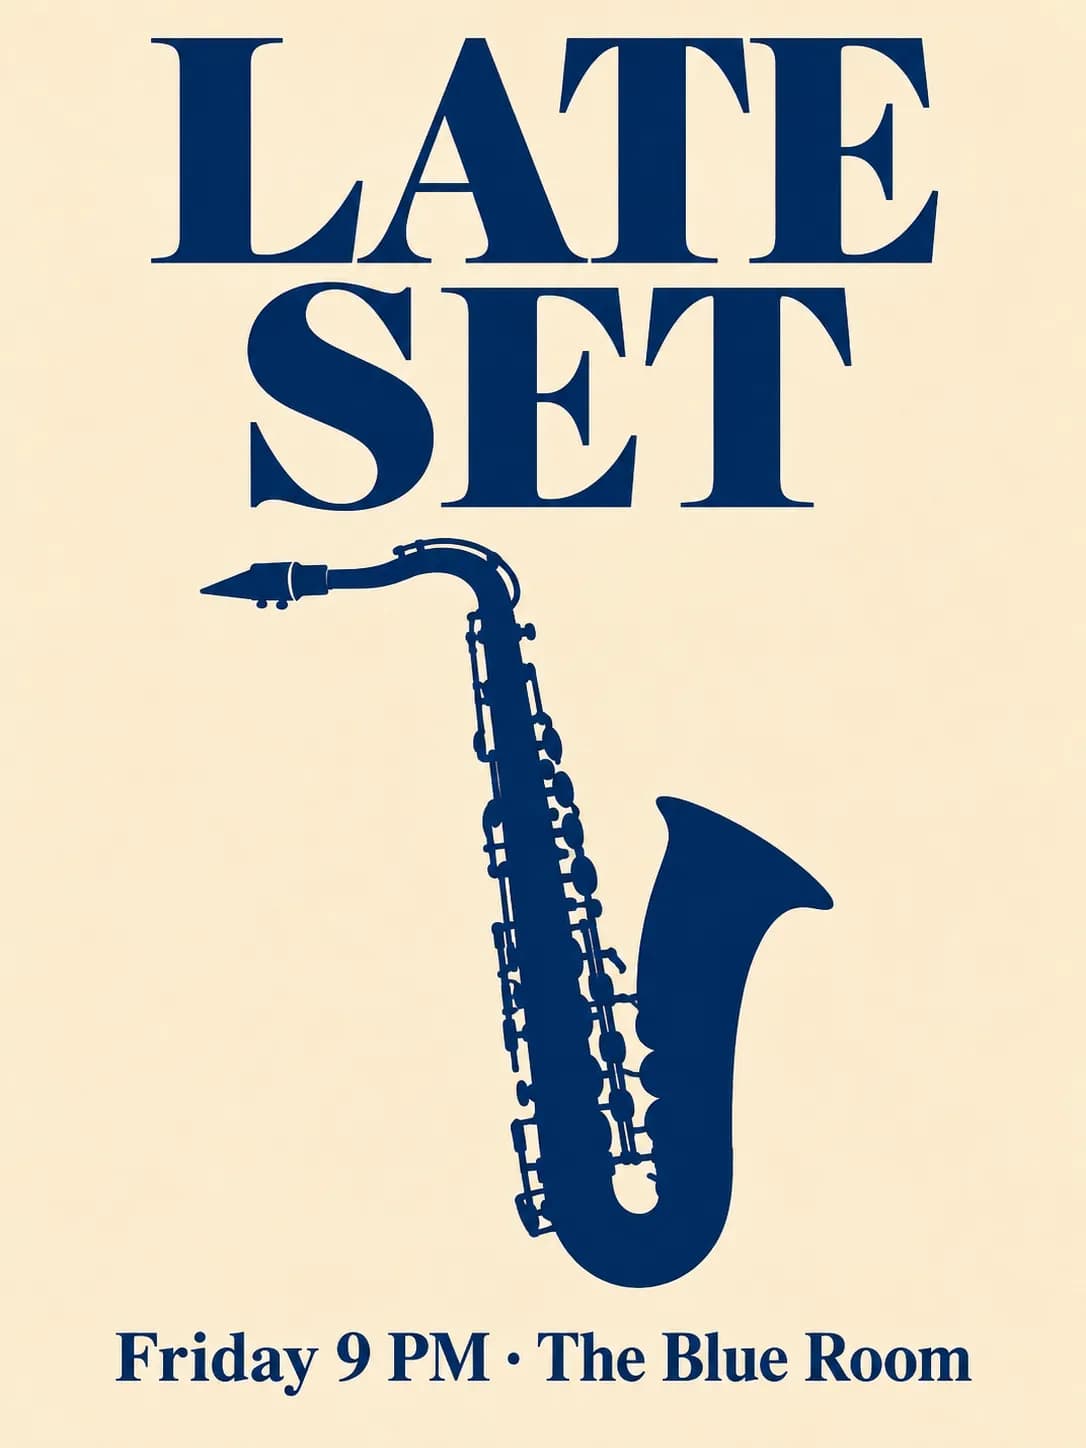
The same poster from four models side by side is on the image model comparison.
What it costs
Images are paid with credits from a one-time pack. Prices depend on the model and resolution, and Claude can quote any request before it runs. If a job fails, the credits go back to your balance automatically.
| Generation | Cost | With 1,000 credits ($10) |
|---|---|---|
| Nano Banana 2 image (1K) | 12 | 83 |
| Image background removal | 2 | 500 |
The full list is on the pricing page.
Tips for better results
- Describe the photo, not the idea. "Overhead shot, linen tablecloth, two espresso cups, morning window light" beats "a cozy café image".
- Say what the image is for. "For an Instagram story" gets you the right shape; "for a website hero with room for a headline on the left" gets you the right composition.
- Quote text exactly. Put words that must appear in the image in quotes, and pick GPT Image 2 for text-heavy designs.
- Keep a winner. When you like a result, ask Claude to use it as the reference for the next images so the set stays consistent.
Questions
Can Claude generate images for free?
Claude itself does not render images on any plan. With Makemancer connected, each image is paid with credits, from 12 credits with Nano Banana 2. The free Claude plan can add one custom connector, so you can use it without upgrading Claude.
Does it work in Claude Code?
Yes. Install the plugin or add the MCP server from your terminal. Claude Code can also upload images from your project folder to edit them.
Can Claude edit a photo I already have?
Yes. Give Claude the image (a link in Claude.ai, or a file path in Claude Code) and describe the change. The model keeps the rest of the picture and applies the edit.
Which model does Claude use by default?
Nano Banana 2. Name another model in your request, such as GPT Image 2 for text-heavy designs, and Claude uses that one instead.
Who owns the images?
You can use the images you generate, including commercially, subject to our terms and the model provider's terms.
Keep reading
 SetupHow to Add a Custom Connector in ClaudeAdd a remote MCP server to Claude as a custom connector: where the button is in Claude.ai and Claude Desktop, what each plan allows, how to switch the tools on in a chat, and how to fix common errors.November 5, 2026 · →
 How-toHow to Generate Videos in Claude CodeClaude Code can't render video by itself, but it can with an MCP server. Install the plugin, turn a still into a clip or write a video from text, and save the files into your project.November 5, 2026 · →